Create and maintain your own bower package

Referencehttps://bower.io/docs/creating-packages/


Prerequisite:

  1. a public git(github/gitlab/bitbucket) repo (for private repos, you need to run a private registry, which won’t be discussed in this article)
  2. have bower installed


A step by step example

1.Have a public git repo ready

I have this really simple sample gitlab repo: https://gitlab.com/christywang/my-bower-package

This pic shows its file structure:

I want to create a bower package with everything inside “css” and “js” folders. So my bower.json is like this:

{
  "name": "christy-bower-package",
  "description": "Christy's bower package example",
  "keywords": [
    "css",
    "js"
  ],
  "license": "MIT",
  "ignore": [
    "/*",
    "!/js",
    "!/css"
  ],
  "dependencies": {
    "jquery": "1.9.1 - 3",
    "bootstrap": "3.3.7"
  }
}

If you have questions on what each field means, please read bower specs: https://github.com/bower/spec/blob/master/json.md


2. register the package

2.1 Run command to register package

The command to register is:

bower register <my-package-name> <git-endpoint>

So I run:

bower register christy-bower-package https://gitlab.com/christywang/my-bower-package.git

The following is what happens:

2.2 Check successful registration

Bower decides package version based on tags. Since I haven’t pushed any tag to my repo yet. As you can see in the following picture, when I run “bower info christy-bower-package”, it shows at the end, “No versions available”:


3. Add  version to the package

3.1 create a git tag and push to remote

git tag 'v0.0.1'
git push origin master --tag

3.2 Check version successfully added

bower info christy-bower-package


4. Install the package

Now If I run:

bundle install christy-bower-package

As you can see in the above picture. It downloads my christy-bower-package, also the two denpendency I listed out in bower.json: bootstrap and jquery. The downloaded file structure is like this:


5. Maintain the package

Any time I want to release a new version of my package, I can just add a tag with increasing version number. But it’s a bit of manual work, luckily, there’s a grunt plugin(grunt-bump) that helps automate this process: https://github.com/vojtajina/grunt-bump

5.1 Create a package.json file with content: {}


5.2 Install grunt and then install grunt-bump

npm install grunt --save-dev
npm install grunt-bump --save-dev

After successful installation, a node_modules folder will be added, and Package.json looks like this:


5.3 Add a .gitignore file and ignore node_modules folder

Since I don’t want node_modules folder appear in git repo. Add the following .gitignore file:


5.4 Set custom grunt bump configuration and load the plugin:

The default config for grunt bump is:

Since I only want to change some of the config properties, the following is my Grutfile.js:

module.exports = function(grunt) {
  grunt.initConfig({
    bump: {
      options: {
        files: ['bower.json'],
        commitFiles: ['-a'],
        pushTo: 'origin'
      }
    }
  });

  grunt.loadNpmTasks('grunt-bump');
};


5.4 Add version field to bower.json

Add version field to bower.json so that grunt bump plugin knows which version to start with:


5.5 Use grunt bump to commit changes and bump the version

grunt bump provides a set of commands to control version. The following is a screenshot of some of the commands available. Please visit its git repo to learn more.https://github.com/vojtajina/grunt-bump

The “grunt bump” command will do the following:
1.Look into “bower.json” file for “version” field. And the value will be the starting version.
2.It will check all files in the repo, commit current file changes. And add a commit message ‘Release v%VERSION%’.
3.It will create a tag with specified tag name and tag message.
4.It will push to remote ‘origin’.

Run:

grunt bump


5.7 Install the package again and confirm that version has been bumped

Run:

bower install christy-bower-package

Rails add a search function controller and route best practice

1.Task description

I worked on a Ruby on Rails app, and one day I got a task to add this new feature:

Create a search page(So user can search items by category).

After hitting the “search” button, it takes the user to item list page.


For simplicity and to avoid dragging  myself away from the main topic I want to talk about:

The search page could simply look like this:

1

The item list page could just look like this:

1


2.My initial approach

2.1 Strategy:

Q: How to render the search page?

A: Create a search action.

Q: How to perform the search function?

A: Create a index action, which handles the search function. The search form should submit a post request to this action.

Q: How to render the item list page?

A: Let index action render item list page.

2.2 Implementation:

Route:

config/routes.rb:

get ‘items/search’, to: ‘items#search’
post ‘items/index’, to: ‘items#index’

1

Controller:

items_controller.rb:

class ItemsController < ApplicationController
def index
# perform search code goes here
render ‘index’
end

def search
render ‘search’
end
end

View:

/items/search.html.erb:

<%= form_tag items_index_path, method: ‘post’ do %>
<label>category:</label>
<input type=”text” name=”category”>
<button>search</button>
<% end %>

2.3 Implementation in action

1

after hitting the search button:

1

2.4 Problem

This works perfectly, until I manually refreshed the index page.

1

Since there’s no get route, it errors out! Of course I could add a get route, but in that way, I will have to store the form parameters in session. Is there another approach?


3. Second approach

3.1 Strategy:

Q: How to render the search page?

A: Create a search action.

Q: How to perform the search function?

A: Create a index action, which handles the search function. The search form should submit a get request to this action, so that the search parameters are in the URL, so that I don’t need to worry about storing them in session.

Q: How to render the item list page?

A: Let index action render item list page.

A note: 

In the future, there might be other tasks to add view item detail, edit item functions and on. So it’s better  use rails default resource: http://guides.rubyonrails.org/routing.html

3.2 Implementation:

Route:

config/routes.rb:

get ‘items/search’, to: ‘items#search’
resources :items, only: [:index] do
end

1

Controller:

The same as first approach.


View:

/items/search.html.erb:

<%= form_tag items_path, method: ‘get’ do %>
<label>category:</label>
<input type=”text” name=”category”>
<button>search</button>
<% end %>

3.3 Implementation in action

1

after hitting the search button:

1


3.4 Concern

We can see the parameters are passed in the URL, and I’m good even though I refresh.

This approach definitely works. The only concern is that it brought in a search action, which is not part of rails default resource; and the search page and item list page are on different URL.

I want to utilize rails default resource, and keep search and item list page on the same URL.

So here comes the third approach.


4. Third approach

4.1 Strategy:

Q: How to render the search page?

A: Use index action. Check if user is not performing a search, render search page. (Trick is add a hidden input in the form)

Q: How to perform the search function?

A: Perform it in index action.

Q: How to render the item list page?

A: Use index action. Check if user is performing a search, render index page.


4.2 Implementation:

Route:

config/routes.rb:

resources :items, only: [:index] do
end

Controller:

class ItemsController < ApplicationController
def index
if params[:search].blank?
render ‘search’
else
# perform search code goes here
render ‘index’
end
end
end

View:

/items/search.html.erb:

<%= form_tag items_path, method: ‘get’ do %>

<input type=”hidden” name=”search” value=”true”>
<label>category:</label>
<input type=”text” name=”category”>
<button>search</button>
<% end %>

3.3 Implementation in action

1

after hitting the search button:

1


Capistrano deploy flow outline

Official flow reference: http://capistranorb.com/documentation/getting-started/flow/

An example flow:

Deploy: starting

Rbenv ensures that the version we configured on config/deploy.rb is installed and that it can write on disc.

Checks git repository

Create needed folder tree

/var/www

App_name

Shared

Public

Assets

Releases


Deploy: updating

Clone the whole repo in /var/www/app_name/repo

Creates a new folder date-time named on /var/www/app_name/releases/20140717180754

Copies the project there


Deploy: publishing

Runs bundle install in last release folder

Runs assets:precompile copying our minimized assets to shared/public/assets

Creates a soft link from last release to /var/www/app_name/current

Restar server.


Deploy:finishing

Logs deployment to revisions.log

Set up Zend Framework Skeleton Application on Mac Step by Step

1.Install Composer

Follow Composer official guide and install it locally: https://getcomposer.org/download/

Run the following commands:

$ php -r “copy(‘https://getcomposer.org/installer&#8217;, ‘composer-setup.php’);”

$ php -r “if (hash_file(‘SHA384’, ‘composer-setup.php’) === ‘070854512ef404f16bac87071a6db9fd9721da1684cd4589b1196c3faf71b9a2682e2311b36a5079825e155ac7ce150d’) { echo ‘Installer verified’; } else { echo ‘Installer corrupt’; unlink(‘composer-setup.php’); } echo PHP_EOL;”

$ php composer-setup.php

$ php -r “unlink(‘composer-setup.php’);”

Here is the screenshot of what I did:

1

I got a warning about OpenSSL version, we can just ignore it for now.

Now I can see that composer.phar has been created in my file system:

3


2.Verify that Composer is installed successfully:

Since I installed Composer locally, so when I need to run Composer, I need to cd into the installation path, and run

$ php composer.phar

2


If you want to install Composer globally, you can follow this guide: https://getcomposer.org/doc/00-intro.md#installation-linux-unix-osx


3. Install ZendSkeletonApplication

Follow the instruction on the Github repository: https://github.com/zendframework/ZendSkeletonApplication

Here I want to clone the application in “zend” folder, so I run this command:

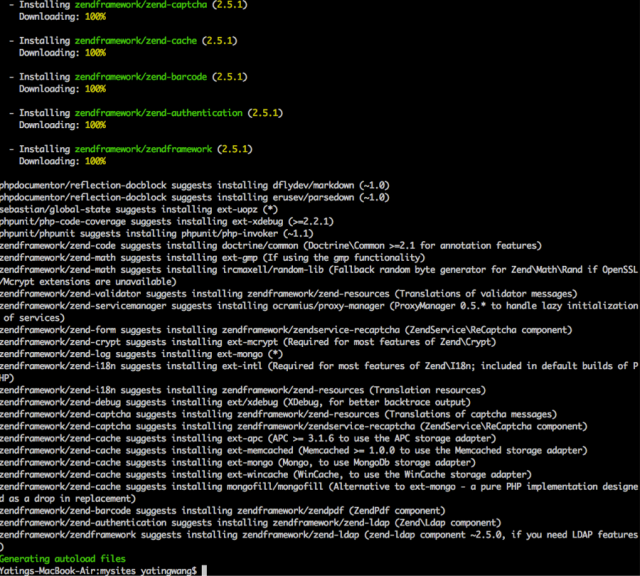
$ php composer.phar create-project -n -sdev zendframework/skeleton-application zend

The screenshot:

4

….

5


4. Verify that ZendSkeletonApplication has been installed successfully

We can see that a “zend” folder is created and the application files are placed inside:

6

Start apache server(my apache root directory is parent folder of “mysites”), go to http://localhost/mysites/zend/public/

We can see the skeleton application running:

7


Host a website on Amazon AWS step by step guide

1.Sign in to the console using AWS credentials.

You will see a page listing all AWS web services:

QQ20160515-0


2.Click on “EC2” to go to EC2 dashboard:QQ20160515-1


3.Click on “Launch Instance” to start the process of  creating a new EC2 instance:

QQ20160515-3

Notice: there should be a step to create security key pairs for later access to running EC2 instance. But since I’ve already created one in my account, the system skips the step. Just remember to save the private key to a safe place, we will need it to SSH into the instance later.


3.1Choose AMI

Here I will just choose the forth one: Ubuntu Server.

QQ20160515-4


3.2Choose Instance Type

Here just choose the default one:

QQ20160515-5


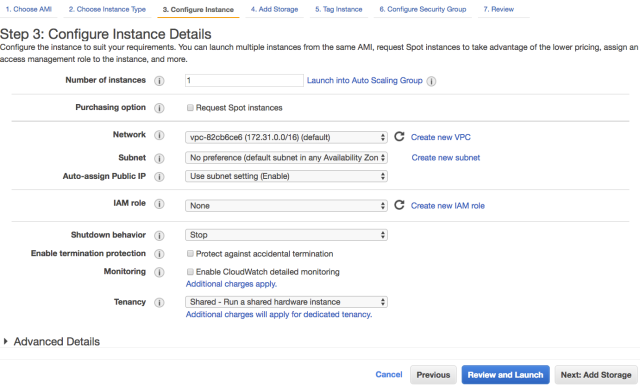
3.3Configure Instance Details

Here we can keep everything default, no need to change any settings:

QQ20160515-6


3.4Add Storage

Here we can keep everything default, no need to change any settings:

QQ20160515-7


3.5Tag Instance

Here the Value we put will be the name of this instance, and it will be displayed on our AWS EC2 dashboard:

QQ20160515-8


3.6Configure Security Group

This step is very important!

Firstly, I want to talk about my failure experience:

According to my experience, normally if I start something new, default is most likely to be a good choice.

So for “Assign a security group”, I selected the “Select an existing security group” radio button, and chose the first security group listed, whose name is “default”. The following is the screenshot:

QQ20160515-9

And I just clicked the “Review and Launch” button.

Then I waited for a few minutes for the instance to be running. Sadly, because of the default group setting, I couldn’t SSH into the instance, which means I could do nothing about the instance. The instance was dead for me!


After checking some tutorials, I got to know that I have to create a new security group and add custom access rules. Here is the screenshot of the rules we need:
QQ20160517-0


4.Then we can see the running instance in EC2 dashboard

QQ20160517-1

QQ20160517-2


5.SSH into the instance

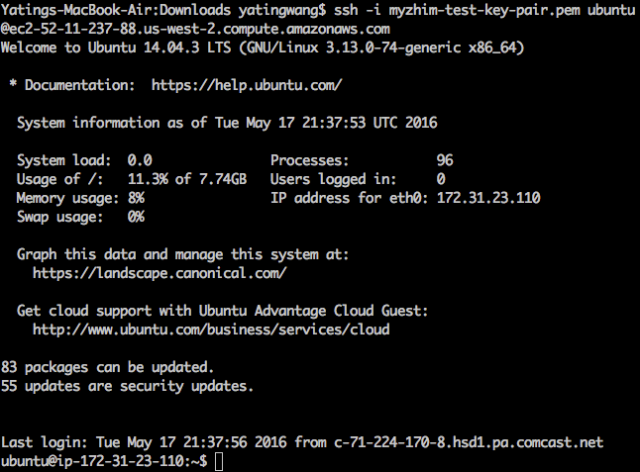
In command shell, cd to the directory that the private key is located. Then run this command:

$ ssh -i [private_key_file_name] ubuntu@[public_DNS_address]

For example:

QQ20160517-4


6.Run as root and access website folder

$ sudo su

$ cd /var/www/html/


[Consul]Error starting agent: Failed to get advertise address: Multiple private IPs found. Please configure one.

Problem: Error starting agent: Failed to get advertise address: Multiple private IPs found. Please configure one.

I’m new to Consul, so on my windows system, I was following the official guide: https://www.consul.io/intro/getting-started/agent.html

until this step:

$ consul agent -dev

and get this error:

1


Why got this error:

If we don’t specify a bind address, Consul will by default listen on the first private IP on the system, and this might not work.

An explanation of private IP address vs public IP address


Solution:

To solve the problem, we need to explicitly specify it.

Step1: Find the private IPV4 address of this system:

$ ipconfig

3

We can see from the screenshot, the IPv4 Address is 192.168.231.18.

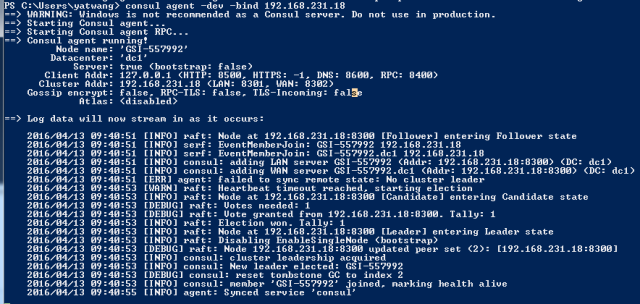
Step2: Specify the bind address  and start the agent:

$ consul agent -dev -bind 192.168.231.18

4

From the above screenshot, we can see now the agent is successfully up and running.

USB storage capacity reduced to 2MB from 14GB

Problem:

I created a bootable USB stick on Windows. Then My USB storage capacity reduced to 2MB from 14GB.

1


Solution:

Step1:

Follow the steps from this link: http://askubuntu.com/questions/289971/usbs-storage-capacity-reduced-to-2-mb-from-16-gb

The following is the screenshot of what I did:

10

Step2:

Now we can see that Used space and Free space both become 0 bytes:

3

Step3:

We need to format the disk:

4

Step4:

After formatting, we could see that the USB’s capacity turns back to be normal:

5